Indoor Fitness: Embrace Winter Workouts in Your Living Room
In the dark season, it's often challenging to muster the motivation to head out for sports. Fitness expert Ingo Froböse has the solution for those who don't want to miss cozy Netflix evenings but still aim to stay fit: The Living Room Workout!
Multiple times a week, I jog through the park, dear readers. As it gets colder and less inviting outside, I encounter fewer companions—too cold, too wet, too dark to rally for the usual rounds after work.
Yet, especially in winter, it's crucial to keep moving! Because those who consistently swap the park or gym for the cozy couch quickly lose their fitness and stamina. 'Use it or lose it,' is one of my favorite sayings—or as my grandmother used to say, 'Whoever rests, rusts.' Additionally, exercise isn't just beneficial for the body; it also uplifts our often-affected psyche during winter. Furthermore, our immune system benefits, aiding us in braving the cold and flu season. Moreover, post-exercise, we sleep deeply and soundly, waking up refreshed and alert the next morning—now, that's motivation to transform your living room into a mini fitness studio!
Because—here's the good news for winter grumps—even during a cozy DVD or series night, you can do something for your body without having to venture out into the cold, gray world. To get fit or maintain fitness, you don't need equipment. The most versatile and best training equipment is always with you: Your body!
In a relaxed manner, I'd like to present building blocks for a holistic living room workout that will keep your body in shape. That way, you'll be able to start spring with a cheerful mood and a solid foundation of fitness!
Here's what you need for the Living Room Workout:
- A soft carpet or yoga mat
- A sturdy chair or bench
- Comfortable clothing that allows movement
- An episode of your favorite series or your favorite music
- A water bottle
Episode 1: The Living Room Workout for Beautiful Legs
For long, slender, elegant muscles, the best training involves intensity and only a few repetitions.
Choose exercises where each one is truly challenging, causing your muscles to burn. This creates micro-tears in the protein structure of your muscles. When the body repairs these tears, it does so more generously, preparing for higher future demands. The muscle stores more proteins and grows from within.
You can find uncomplicated, protein-rich evening meal recipes in the EAT SMARTER gallery.
Despite all the motivation, listen to your body's signals; pay attention to how you feel after the workout. And rejoice in combining a healthy muscle ache with your favorite series!
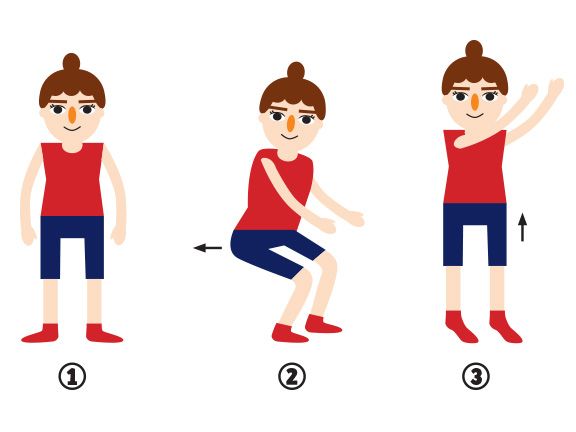
Squats
Complete ten to 15 repetitions per set; experts do 20.
After several repetitions, you should feel a slight burn in the front of your thighs and buttocks.
To make the exercise easier, use a stable chair for support. Place a chair in front of you while performing the movement and hold onto the backrest. To intensify the exercise, you can hold water bottles or books in both hands or just one.
Correct Squat Execution:
Starting Position: Shoulder-width stance with slightly turned-out feet, slightly bent knees
The pelvis is in a neutral position (neither too tilted nor upright)
Now, slowly lower your buttocks downward, as if you're sitting on a chair. Keep your knees behind your toes throughout the movement, bending until your thighs are parallel to the floor. Inhale during this phase.
Slowly and deliberately return to the starting position, exhaling as you ascend.
Variations of Squats:
Sumo Squats: The feet are positioned slightly wider than shoulder-width apart and rotated outward by 45 degrees. This emphasizes the inner thigh area (the rest of the execution is the same as the regular squat).
Single-Leg Squats (for advanced):
Starting Position: Feet together, shift your weight to the right foot and extend the left leg in front of your body
Now, slowly bend the left leg, moving your buttocks downward until the right shin is parallel to the floor. Simultaneously, stretch your arms forward.
Rise slowly, keeping the upper body forward with the stretched arms. Then, switch sides.
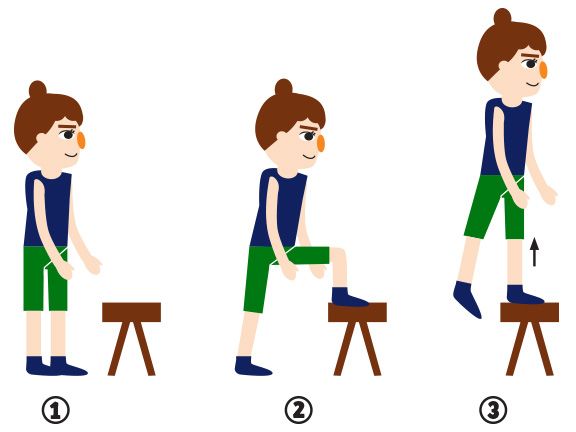
Step-Ups
Complete 10 to 20 repetitions per side. Variation: Start with one leg stepping up and down, then switch.
When you feel the entire thigh muscles and buttocks burn and ache, you've reached the right intensity of movement.
To intensify the exercise, use water bottles, books, or dumbbells.
Correct Step-Up Execution:
Starting Position: Stand with legs hip-width apart in front of the object, keeping your upper body upright
Now, step onto the object with one leg and position the foot entirely. Ideally, the thigh should be parallel to the floor, with the other leg remaining straight.
Straighten the bent leg and move the upper body upwards, ensuring the passive leg stays straight and doesn't support the execution. Exhale during this movement phase.
Now, slowly bend the active leg again, allowing the passive leg to return to the floor. In this phase, inhale.
Once you're at the bottom, switch legs.
Leg Curls

Complete 10 to 15 repetitions per side for this exercise.
When you feel a burning sensation in the entire thigh area, you've reached the right intensity of movement. You can increase resistance using a Theraband or ankle weights.
Correct Leg Curl Execution:
Starting Position: Stand upright with legs approximately hip-width apart. Find a fixed point for support if needed (a stable chair or wall).
Initially, the left leg is the standing leg, slightly bent and 'passive,' while the right leg is active, lifted off the ground.
Now, bend the right leg, bringing the foot towards the buttocks as far as possible. Keep the thigh perpendicular to the floor throughout the movement, moving only the lower leg. Maintain a straight and upright upper body.
Slowly lower the leg back to almost full extension.
Heavier Variation:
Start in a quadruped position, hands under the shoulders, looking toward the ground.
Lift the right leg until it's parallel to the floor.
Now, draw the lower leg towards the buttocks while keeping the thigh still. Then, slowly extend the lower leg back to the same height as the thigh.
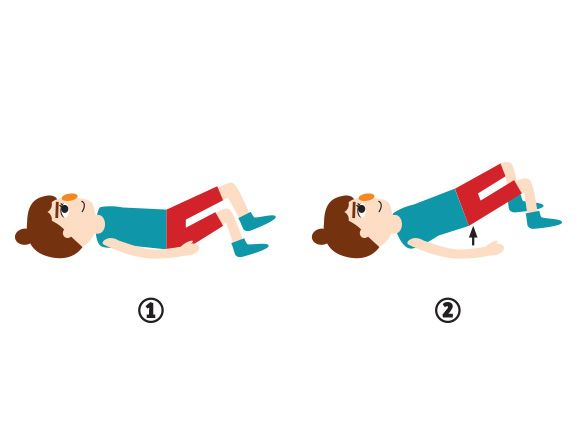
Hip Raises
Complete about 12 to 15 repetitions. When you feel the muscles in your back, buttocks, and rear thighs burning and aching, you've achieved the right intensity. Additional weight can be placed on the hips/lower abdomen or attached with ankle weights.
Correct Hip Raise Execution:
Starting Position: Lie on your back on the floor, arms relaxed by your side, feet hip-width apart on the ground.
Cross your arms in front of your chest, pressing your lumbar spine into the floor. Slowly roll up from the coccyx over the lumbar and thoracic spine, vertebra by vertebra, forming a line from your shoulders to hips to knees.
The neck and shoulder muscles should remain relaxed.
Hold this position for about three seconds, then lower your hips—don't let them touch the floor but pause just before and then raise them again.
To make the exercise harder:
When you're in the bridge position, extend one leg in line with the shoulder-hip-knee line and hold for 10 to 15 seconds. Breathe calmly and evenly.
Then, lower the leg, bring down the hips, and switchsides.
If you like, we can continue next week. I'll then introduce four effective exercises for the abdomen. Until then, enjoy the Advent season!